Since you’re here, you’re probably a programmer who would like to understand the exact process and steps required to put together your own UTM Event Strategy and then organize and create all the individual UTMs necessary to conduct a campaign.
If you’re not, feel free to go back to the article that originally introduced UTMs and offers a 30,000 foot overview of this process. It will also explain briefly how AttendStar can track your marketing results for you through your event ticketing campaign at no additional charge.
Check out: Learn the Code that Boosts Your Event Marketing R.O.I. & Ticket Sales
How to Create UTMs
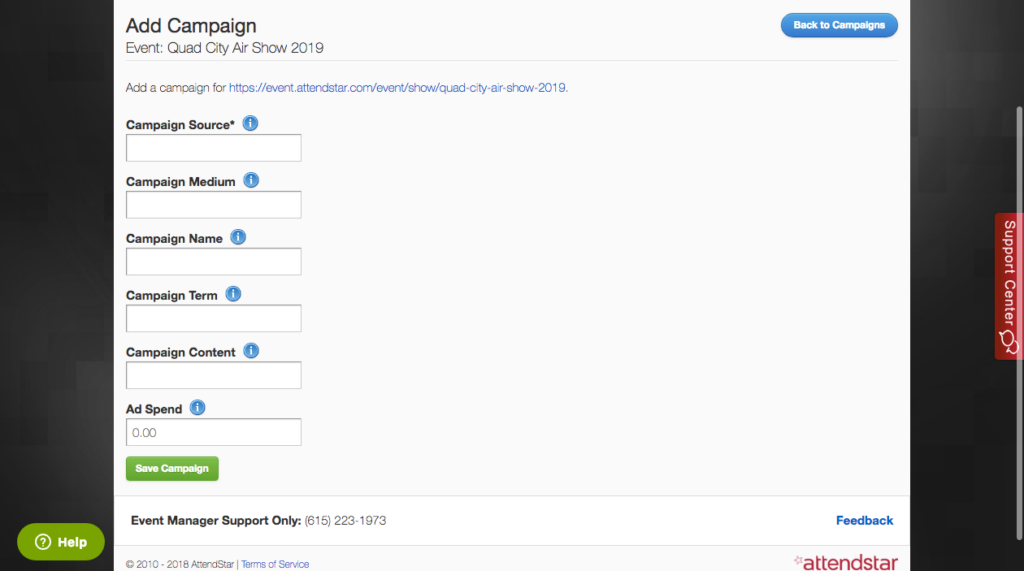
Creating UTMs used to require logging into Google Analytics or using a third party tool. With the launch of UTM creation and tracking within AttendStar’s ticketing platform, you can now create your UTMs with the form pictured below and track marketing link performance in one place!

UTMs consist of the five parts shown in the AttendStar form pictured above:
Campaign Source (utm_source)
This is the source of your link traffic such as Facebook, Instagram, email, and so on.
Campaign Medium (utm_medium)
Use this field to identify the type of link such as cost-per-click (CPC), banner ad, social media ad, affiliate, and so on.
Campaign Name (utm_name)
This field is used to name your overall campaign. You might have many links for different types of ads in a single campaign. For example, you could run a 10% ticket discount offer and advertise it across all of your social media accounts. All of the ads would be part of the same campaign, which you could give the campaign name of “10 percent discount” or another descriptive name.
Campaign Term (utm_term)
This field can serve two purposes depending on your UTM strategy. You can use it to identify keywords used in paid search ads, or you can use it to identify details about the audience who clicked on your link. For example, you could create a term called “los angeles locals” or something similar to track where people who click on your link are from.
Campaign Content (utm_content)
Use this field to describe specifics about the ad creative. For example, if you’re running an A/B split test on Facebook and want to know which creative is generating the most sales, you need to be able to track each version of the ad independently. By setting up UTMs with a descriptive Campaign Content terms, you can do it!
Creating a UTM Strategy
It’s important be 100% consistent when you create your UTMs. Best practices recommend that you use all lowercase letters and use dashes rather than underscores or other characters in your links and UTMs.
Next, create a guide that details your UTM naming strategy and a spreadsheet to track your UTMs. Every time you create a new UTM, add it to your spreadsheet. This ensures you’re following a consistent strategy and makes it easy to find a UTM if you forget what it was for in the future.
It is also a good idea to shorten your URLs with UTMs appended to them because those URLs can get very long. Many people perceive long URLs with a lot of information they don’t understand to be spam. You don’t want that to happen, so consider using a URL shortener, such as Bitly, to solve the potential problem. This is also important when people share your links via social media where space can be at a premium.
Keep in mind, AttendStar automatically shortens your URLs with appended UTMs, so this step won’t be necessary if you create UTMs within the AttendStar ticket sales platform.
Your UTM tracking spreadsheet should include the following columns:
- Date
- Source
- Medium
- Name
- Term
- Content
- Destination URL (where the link takes the person who clicks it in an ad, etc.)
- Tagged URL (the full URL with the UTM appended)
- Shortened URL
- Notes (explain what the URL is for and what you want to happen when people click on it)
Tracking Results Using UTMs
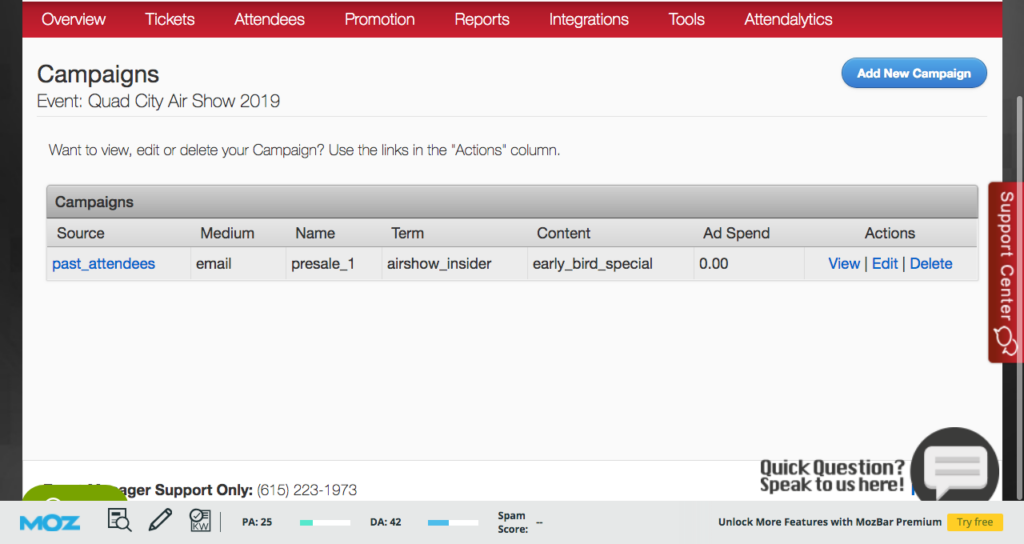
As mentioned above, you can set up goals and reports for your UTM links in Google Analytics to track the performance of your marketing investments, but if you use AttendStar to sell event tickets, then you can access this information from within your AttendStar dashboard. Just create your UTMs using the form shown above and navigate to the Campaigns page for your event to view all of your campaigns as shown in the image below.

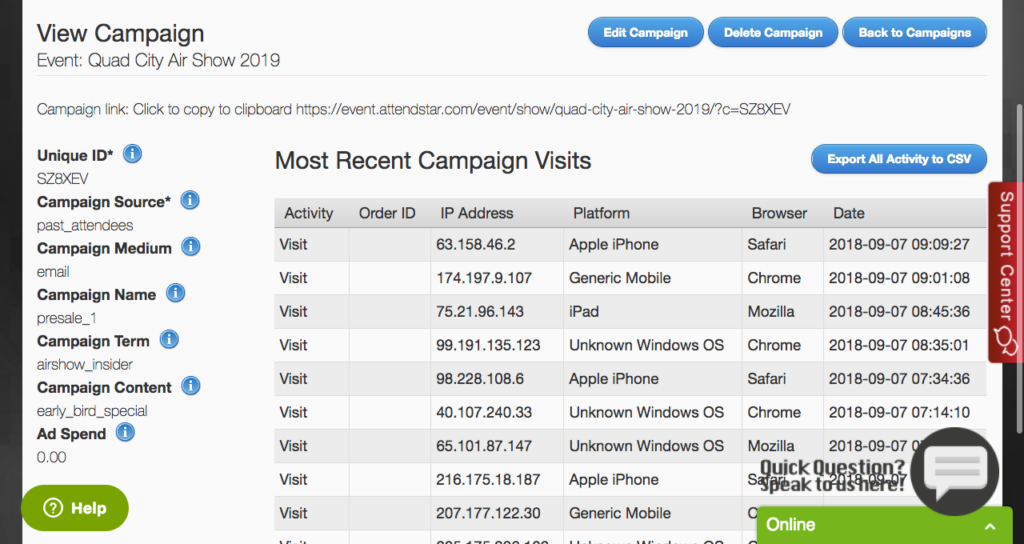
From this page, you can click the specific campaign you want to analyze, and the View Campaign page will open for each campaign as shown in the image below.

Here you can view all of your campaign data. Just click any of the items from the left side of the page (e.g., Campaign Source, Campaign Medium, etc.), and you can track clicks, sales, ROI, and more based on each item. You can also export your data to use in any other tools or spreadsheets that you want. In addition, you can create partner or affiliate links to share sales revenue.
Most ticketing platforms require that you use multiple tools to access and analyze UTM and campaign data, but AttendStar integrates everything in one place to save you time and make things easier for you. Using the UTM feature takes almost no set up, so event marketers can finally track ROI without logging into Google Analytics, which can be time-consuming and daunting.
Finally, the new AttendStar Client Success Team will monitor your data behind the scenes and is available to help you improve your results at any time. The team will also be gathering data across all ticket sellers to compare success factors between events. The team will share this information with clients to help boost their ticket sales. Don’t worry, AttendStar will never share specific client or user information with anyone!
AttendStar wants your events to be successful, and offering these new features and reports is just one more way to do it. If you want to learn more about UTMs and reporting in the AttendStar ticketing platform or want to learn more about selling tickets through AttendStar, call 615-223-1973 or fill out the contact form to get started.


